

10 Must-Make Holiday Recipes to Wow Guests! Cook Now
Are You Ready to Transform Your Holiday Gathering?
Did you know that 73% of holiday hosts feel stressed about menu planning, yet guests remember food more than decorations? This holiday season doesn’t have to be overwhelming. Whether you’re hosting a festive dinner party, a cozy family gathering, or a casual get-together with friends, having the right holiday recipes in your arsenal can make all the difference between a memorable celebration and a stressful experience.
The secret to hosting success lies not in complicated techniques or exotic ingredients, but in choosing versatile, crowd-pleasing dishes that deliver maximum flavor with reasonable effort. Today, we’re unveiling 10 spectacular holiday recipes that strike the perfect balance between impressive presentation and straightforward execution. From savory appetizers that disappear within minutes to show-stopping desserts that earn rave reviews, these recipes are designed to help you cook with confidence and celebrate with ease.
These carefully curated holiday recipes include appetizers, main courses, sides, and desserts that work beautifully together or stand alone. Each recipe features detailed instructions, timing guidance, nutritional information, and expert tips to ensure your success. Let’s dive into these festive favorites that will make your holiday gathering absolutely unforgettable!
Table of Contents
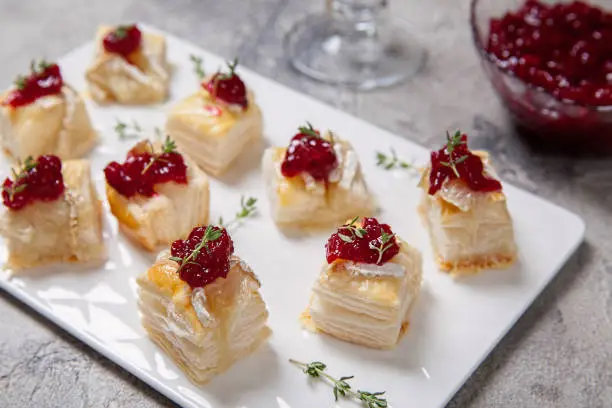
Recipe 1: Cranberry Brie Bites with Puff Pastry
Ingredients List
- 1 sheet frozen puff pastry (thawed according to package directions). Substitution: Phyllo dough for a lighter, crispier texture.
- 8 oz Brie cheese (cut into 24 small cubes). Substitution: Camembert or goat cheese.
- ½ cup cranberry sauce (homemade or canned). Substitution: Fig jam or apricot preserves.
- ¼ cup chopped pecans (toasted for enhanced flavor). Substitution: Walnuts or sliced almonds.
- 2 tablespoons honey for drizzling
- Fresh thyme leaves for garnish (about 2 sprigs)
- 1 egg (beaten, for egg wash)
Timing
- Prep Time: 15 minutes
- Cook Time: 18 minutes
- Total Time: 33 minutes
Efficiency Note: These bites take 40% less time than traditional cheese appetizers while delivering restaurant-quality results.
Step-by-Step Instructions
Step 1: Prepare the Pastry Cups
Preheat your oven to 375°F (190°C). Roll out the thawed puff pastry on a lightly floured surface. Cut into 24 squares (approximately 2 inches each). Press each square into the cups of a mini muffin tin, creating small pastry shells.
Step 2: Add the Cheese and Cranberry
Place one cube of Brie in each pastry cup. Top with ½ teaspoon of cranberry sauce and a sprinkle of chopped pecans. The combination creates a perfect sweet-savory balance.
Step 3: Apply Egg Wash and Bake
Lightly brush the exposed pastry edges with beaten egg for a golden finish. Bake for 15-18 minutes until the pastry is puffed and golden brown, and the cheese is melted and bubbly.
Step 4: Garnish and Serve
Remove from oven and let cool for 2-3 minutes. Drizzle with honey and garnish with fresh thyme leaves. Serve warm for the best texture and flavor experience.
Nutritional Information (Per Bite)
- Calories: 85
- Total Fat: 6g (8% DV)
- Saturated Fat: 3g
- Cholesterol: 15mg (5% DV)
- Sodium: 95mg (4% DV)
- Total Carbohydrates: 6g (2% DV)
- Protein: 3g
Healthier Alternatives for the Recipe
- Use whole wheat puff pastry to increase fiber by 2g per serving
- Replace Brie with reduced-fat cream cheese to cut calories by 30%
- Use sugar-free cranberry sauce to reduce sugar content by 60%
- Skip the honey drizzle to save 15 calories per bite
Serving Suggestions
Arrange these elegant bites on a white serving platter garnished with fresh cranberries and rosemary sprigs. They pair beautifully with sparkling wine, champagne, or spiced apple cider. Serve as the first appetizer when guests arrive to set a festive tone. These also work wonderfully on a holiday cheese board alongside crackers, grapes, and cured meats.
Common Mistakes to Avoid
- Overfilling the cups: Too much filling causes overflow and soggy pastry. Stick to the recommended amounts.
- Not thawing pastry properly: Frozen pastry tears easily. Thaw in refrigerator for best results.
- Skipping the egg wash: This step creates the beautiful golden color that makes these bites irresistible.
Storing Tips for the Recipe
- Make-Ahead: Assemble unbaked bites up to 24 hours ahead. Cover and refrigerate. Bake just before serving.
- Leftovers: Store in an airtight container in the refrigerator for up to 3 days. Reheat at 350°F for 5-7 minutes to restore crispness.
- Freezing: Freeze unbaked bites for up to 1 month. Bake from frozen, adding 3-5 minutes to cooking time.
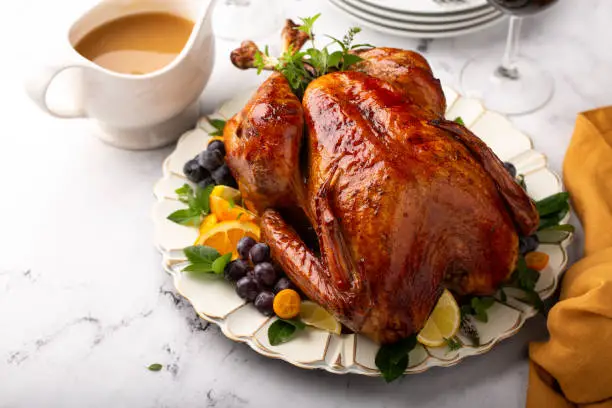
Recipe 2: Classic Roasted Turkey with Herb Butter
Ingredients List
- 1 whole turkey (12-14 pounds, thawed if frozen)
- 1 cup unsalted butter (softened to room temperature). Substitution: Olive oil for dairy-free option.
- ¼ cup fresh herbs (mix of rosemary, thyme, sage, and parsley, finely chopped)
- 6 cloves garlic (minced)
- 2 tablespoons lemon zest
- 2 teaspoons sea salt
- 1 teaspoon black pepper
- 1 onion (quartered)
- 1 lemon (halved)
- 4 cups chicken or turkey broth for basting
Timing
- Prep Time: 25 minutes
- Cook Time: 3 hours 30 minutes
- Resting Time: 30 minutes
- Total Time: 4 hours 25 minutes
Planning Tip: For a 6 PM dinner, start preparation at 1 PM. This timing ensures perfectly cooked, juicy turkey.
Step-by-Step Instructions
Step 1: Prepare the Herb Butter
In a medium bowl, combine softened butter, chopped herbs, minced garlic, lemon zest, salt, and pepper. Mix thoroughly until all ingredients are evenly distributed. This aromatic compound butter is the secret to incredibly flavorful, moist turkey.
Step 2: Prepare the Turkey
Remove turkey from packaging and pat completely dry with paper towels. Remove giblets and neck from the cavity. Let turkey sit at room temperature for 30 minutes before roasting for even cooking.
Step 3: Apply Herb Butter Under the Skin
Carefully slide your fingers under the turkey skin to loosen it from the breast and thighs. Spread two-thirds of the herb butter directly under the skin, massaging it evenly across the meat. This technique keeps the turkey incredibly moist and infuses deep flavor.
Step 4: Season and Stuff the Cavity
Rub the remaining herb butter all over the outside of the turkey. Place quartered onion and lemon halves inside the cavity. These aromatics steam from the inside, adding subtle flavor throughout.
Step 5: Roast the Turkey
Place turkey breast-side up on a roasting rack in a large roasting pan. Pour 2 cups of broth into the bottom of the pan. Roast at 325°F (163°C) for approximately 15 minutes per pound. Baste every 45 minutes with pan juices and remaining broth.
Step 6: Monitor Temperature and Rest
Turkey is done when the thickest part of the thigh reaches 165°F (74°C). Tent with foil and rest for 30 minutes before carving. This resting period allows juices to redistribute, ensuring every slice is moist.
Nutritional Information (Per 4 oz serving)
- Calories: 210
- Total Fat: 10g (13% DV)
- Protein: 32g (64% DV)
- Cholesterol: 90mg (30% DV)
- Sodium: 180mg (8% DV)
Healthier Alternatives for the Recipe
- Use olive oil instead of butter to reduce saturated fat by 50%
- Remove the skin before eating to cut calories by 70 per serving
- Choose organic, free-range turkey for higher omega-3 content
- Reduce salt to 1 teaspoon and use herbs for flavor instead
Serving Suggestions
Present your beautifully roasted turkey on a large platter surrounded by fresh herbs, roasted vegetables, and citrus slices. Serve alongside cranberry sauce, gravy, stuffing, mashed potatoes, and green bean casserole for a traditional feast. Provide both white and dark meat options to please all preferences. Reserve the carcass for making rich turkey stock later.
Common Mistakes to Avoid
- Not thawing completely: A frozen turkey takes 24 hours per 5 pounds to thaw in the refrigerator
- Overcooking: This is the #1 reason for dry turkey. Use a thermometer and remove at exactly 165°F
- Not letting it rest: Cutting immediately causes all the juices to run out
- Stuffing the cavity too full: This prevents even cooking. Aromatics only, no stuffing inside
Storing Tips for the Recipe
- Refrigerate within 2 hours: Slice leftover turkey and store in airtight containers for 3-4 days
- Freeze for longer storage: Turkey freezes well for up to 3 months. Wrap tightly in freezer paper
- Use for multiple meals: Turkey sandwiches, soup, casseroles, and salads throughout the week
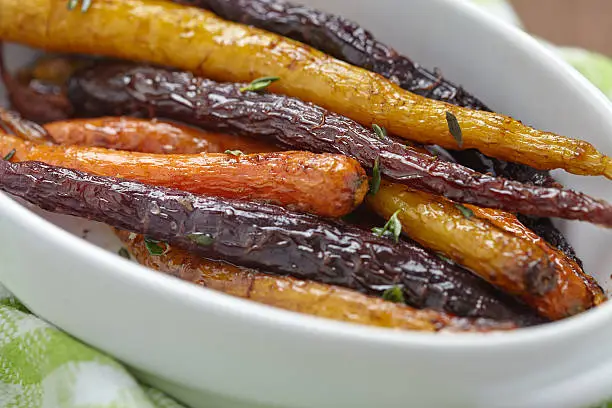
Recipe 3: Maple-Glazed Roasted Carrots with Thyme
Ingredients List
- 2 pounds baby carrots or regular carrots (peeled and cut into sticks). Substitution: Rainbow carrots for visual appeal.
- 3 tablespoons pure maple syrup. Substitution: Honey or agave nectar.
- 2 tablespoons olive oil
- 1 tablespoon balsamic vinegar
- 4 sprigs fresh thyme (leaves stripped)
- 1 teaspoon sea salt
- ½ teaspoon black pepper
- ¼ teaspoon cinnamon
Timing
- Prep Time: 10 minutes
- Cook Time: 35 minutes
- Total Time: 45 minutes
Step-by-Step Instructions
Step 1: Prepare Carrots and Glaze
Preheat oven to 400°F (200°C). In a large bowl, whisk together maple syrup, olive oil, balsamic vinegar, thyme leaves, salt, pepper, and cinnamon. Add carrots and toss until evenly coated.
Step 2: Arrange and Roast
Spread carrots in a single layer on a large baking sheet lined with parchment paper. Roast for 25 minutes, then flip carrots and roast for an additional 10 minutes until tender and caramelized.
Step 3: Final Glaze and Serve
If desired, drizzle with additional maple syrup while still hot. The residual heat will create a beautiful glossy finish. Garnish with fresh thyme sprigs before serving.
Nutritional Information (Per serving, serves 6)
- Calories: 120
- Total Fat: 5g (6% DV)
- Carbohydrates: 19g (7% DV)
- Fiber: 4g (14% DV)
- Sugar: 11g
- Protein: 1g
- Vitamin A: 380% DV
Healthier Alternatives for the Recipe
- Reduce maple syrup to 2 tablespoons to cut sugar by 25%
- Use avocado oil for higher smoke point and more heart-healthy fats
- Add 1 tablespoon orange zest for flavor without extra calories
Serving Suggestions
These vibrant carrots add beautiful color to any holiday recipes spread. Serve alongside roasted turkey, ham, or prime rib. They also work wonderfully on a vegetable platter or as part of a grain bowl. Pair with roasted Brussels sprouts or green beans for a complete vegetable medley.
Common Mistakes to Avoid
- Overcrowding the pan: Carrots steam instead of roast. Use two pans if necessary
- Cutting carrots unevenly: Leads to some pieces overcooked while others are underdone
- Using fake maple syrup: Real maple syrup provides incomparable depth of flavor
Storing Tips for the Recipe
- Refrigerate: Store in airtight container for up to 5 days
- Reheat: Warm in 350°F oven for 10 minutes to restore texture
- Make-ahead: Prepare glaze and cut carrots 1 day ahead. Roast just before serving for best results
Recipe 4: Creamy Garlic Mashed Potatoes
Ingredients List
- 5 pounds Yukon Gold potatoes (peeled and cut into 2-inch chunks). Substitution: Russet potatoes for fluffier texture.
- 1 cup heavy cream (warmed). Substitution: Half-and-half or whole milk.
- ½ cup unsalted butter (cubed, at room temperature)
- 6 cloves roasted garlic (mashed into a paste)
- ½ cup sour cream. Substitution: Greek yogurt for tangier flavor.
- 2 teaspoons sea salt (adjust to taste)
- ½ teaspoon white pepper
- 2 tablespoons fresh chives (chopped, for garnish)
Timing
- Prep Time: 15 minutes
- Cook Time: 25 minutes
- Total Time: 40 minutes
Step-by-Step Instructions
Step 1: Boil the Potatoes
Place potato chunks in a large pot and cover with cold water by 1 inch. Add 1 tablespoon of salt to the water. Bring to a boil over high heat, then reduce to a steady simmer. Cook for 20-25 minutes until potatoes are fork-tender.
Step 2: Drain and Steam
Drain potatoes thoroughly in a colander. Return them to the hot pot and let sit for 2-3 minutes to allow excess moisture to evaporate. This step ensures fluffy, not watery, mashed potatoes.
Step 3: Mash with Garlic
Add roasted garlic paste to the potatoes. Use a potato masher or ricer to mash until smooth with no lumps remaining. For ultra-creamy results, pass through a food mill.
Step 4: Incorporate Dairy
Add butter pieces, stirring until completely melted. Gradually pour in warm cream while continuously stirring. Fold in sour cream. The potatoes should be smooth, creamy, and fluffy. Season with salt and white pepper to taste.
Step 5: Serve Immediately
Transfer to a serving bowl and create a well in the center. Add an extra pat of butter and garnish with fresh chives. Serve piping hot for the best texture and flavor.
Nutritional Information (Per ¾ cup serving, serves 10)
- Calories: 285
- Total Fat: 15g (19% DV)
- Saturated Fat: 10g
- Cholesterol: 45mg (15% DV)
- Sodium: 480mg (21% DV)
- Carbohydrates: 35g (13% DV)
- Protein: 4g
Healthier Alternatives for the Recipe
- Replace heavy cream with unsweetened almond milk to reduce calories by 40%
- Use Greek yogurt instead of sour cream to add protein and reduce fat
- Substitute half the potatoes with cauliflower for a lower-carb version
- Reduce butter to ¼ cup and add chicken broth for moisture
Serving Suggestions
These luxurious mashed potatoes are essential holiday recipes that complement virtually any main course. Create a mashed potato bar with toppings like crispy bacon bits, shredded cheese, caramelized onions, and gravy. They’re perfect alongside turkey, roasted beef, or glazed ham. For elegant presentation, pipe the potatoes using a star tip for individual servings.
Common Mistakes to Avoid
- Using cold dairy: Cold cream cools the potatoes and makes them gummy. Always warm your liquids first
- Overmixing: This activates starch and creates gluey texture. Mix just until combined
- Not salting the cooking water: Potatoes absorb salt during cooking for better overall flavor
- Making them too far ahead: Potatoes are best fresh but can be kept warm for 30-45 minutes
Storing Tips for the Recipe
- Refrigerate: Store in airtight container for up to 3 days
- Reheat gently: Warm in microwave or on stovetop with added cream, stirring frequently
- Make-ahead option: Prepare up to 2 hours ahead and keep warm in slow cooker on low setting
- Freezing: Not recommended as dairy-based potatoes become grainy when frozen and thawed
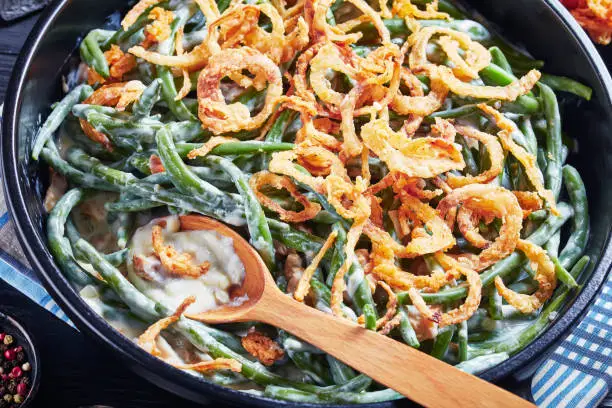
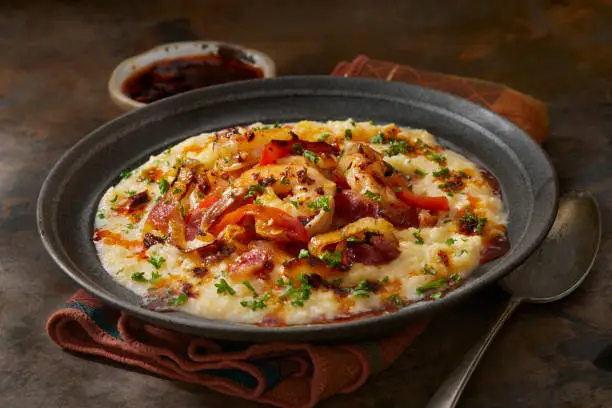
Recipe 5: Classic Green Bean Casserole
Ingredients List
- 2 pounds fresh green beans (trimmed and cut into 2-inch pieces). Substitution: Frozen green beans (thawed).
- 3 tablespoons butter
- 12 oz mushrooms (sliced). Substitution: Cremini or shiitake for deeper flavor.
- 3 cloves garlic (minced)
- 3 tablespoons all-purpose flour. Substitution: Gluten-free flour blend.
- 2 cups whole milk (warmed)
- 1 cup chicken or vegetable broth
- 1 teaspoon soy sauce
- 1 teaspoon onion powder
- ½ teaspoon black pepper
- 1 teaspoon salt
- 1½ cups crispy fried onions (divided, for topping)
- ½ cup shredded cheddar cheese (optional)
Timing
- Prep Time: 20 minutes
- Cook Time: 40 minutes
- Total Time: 1 hour
Step-by-Step Instructions
Step 1: Blanch the Green Beans
Bring a large pot of salted water to a boil. Add green beans and cook for 5 minutes until bright green and crisp-tender. Immediately drain and plunge into ice water to stop cooking. Drain well and set aside.
Step 2: Make the Mushroom Sauce
In a large skillet over medium-high heat, melt butter. Add sliced mushrooms and cook for 8-10 minutes until golden brown and moisture has evaporated. Add minced garlic and cook for 1 minute until fragrant.
Step 3: Create the Cream Sauce
Sprinkle flour over mushrooms and stir continuously for 2 minutes to cook the raw flour taste. Gradually whisk in warm milk and broth. Add soy sauce, onion powder, salt, and pepper. Simmer for 5-7 minutes until sauce thickens enough to coat the back of a spoon.
Step 4: Combine and Bake
Preheat oven to 375°F (190°C). In a large bowl, combine blanched green beans with the mushroom cream sauce. Stir in ½ cup of fried onions. Transfer to a greased 9×13-inch baking dish. Bake for 20 minutes.
Step 5: Add Topping and Finish
Remove from oven, top with remaining fried onions and optional cheese. Return to oven for 5-10 minutes until onions are golden and cheese is melted. Let rest 5 minutes before serving.
Nutritional Information (Per serving, serves 10)
- Calories: 165
- Total Fat: 9g (12% DV)
- Carbohydrates: 16g (6% DV)
- Fiber: 3g (11% DV)
- Protein: 6g
- Vitamin A: 15% DV
- Vitamin C: 20% DV
Healthier Alternatives for the Recipe
- Use low-fat milk to reduce calories by 25%
- Replace fried onions with panko breadcrumbs mixed with herbs for a lighter crunch
- Add ½ cup nutritional yeast for cheesy flavor without dairy
- Increase vegetables by adding diced bell peppers or carrots
Serving Suggestions
This beloved casserole is a cornerstone of holiday recipes traditions. Serve hot directly from the baking dish for rustic family-style presentation. It pairs exceptionally well with turkey, ham, roast beef, or as part of a Thanksgiving feast. For individual servings, bake in ramekins for an elegant plated presentation.
Common Mistakes to Avoid
- Overcooking green beans: They should be crisp-tender, not mushy. Blanching prevents this
- Watery sauce: Cook mushrooms long enough to release and evaporate their moisture
- Adding onions too early: They’ll become soggy. Add only for the final baking stage
Storing Tips for the Recipe
- Make-ahead: Assemble completely up to 1 day ahead. Cover and refrigerate. Add onions just before baking
- Refrigerate leftovers: Store covered for up to 4 days
- Reheat: Warm in 350°F oven for 15-20 minutes, covered with foil
- Freeze option: Freeze before adding onion topping for up to 2 months
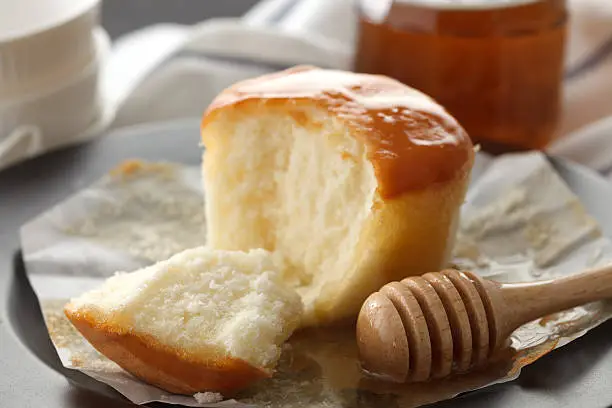
Recipe 6: Honey-Butter Dinner Rolls
Ingredients List
- 4 cups all-purpose flour (plus more for dusting). Substitution: Bread flour for chewier texture.
- ¼ cup granulated sugar
- 2¼ teaspoons instant yeast (1 packet)
- 1 teaspoon salt
- 1 cup whole milk (warmed to 110°F)
- ¼ cup honey
- ¼ cup melted butter (plus 3 tablespoons for brushing)
- 1 large egg (room temperature)
Timing
- Prep Time: 20 minutes
- Rising Time: 1 hour 30 minutes
- Cook Time: 20 minutes
- Total Time: 2 hours 10 minutes
Step-by-Step Instructions
Step 1: Activate the Yeast
In the bowl of a stand mixer, combine warm milk, honey, and yeast. Let stand for 5 minutes until foamy. This proves the yeast is active.
Step 2: Make the Dough
Add melted butter, egg, salt, and 3 cups of flour. Using the dough hook attachment, mix on low speed until combined. Gradually add remaining flour until dough pulls away from bowl sides. Knead on medium speed for 6-8 minutes until smooth and elastic.
Step 3: First Rise
Place dough in a greased bowl, turning once to coat. Cover with plastic wrap and let rise in a warm place for 1 hour until doubled in size.
Step 4: Shape the Rolls
Punch down dough and divide into 16 equal pieces. Shape each into a smooth ball by pulling edges to the bottom. Place in a greased 9×13-inch baking pan, spacing slightly apart.
Step 5: Second Rise and Bake
Cover and let rise for 30 minutes until puffy. Preheat oven to 375°F (190°C). Bake for 18-20 minutes until golden brown. Immediately brush with melted honey butter (2 tablespoons each butter and honey).
Nutritional Information (Per roll)
- Calories: 175
- Total Fat: 5g (6% DV)
- Carbohydrates: 28g (10% DV)
- Protein: 4g
- Sugar: 7g
Healthier Alternatives for the Recipe
- Replace half the flour with whole wheat flour for added fiber
- Use almond milk for dairy-free version
- Reduce sugar to 2 tablespoons without affecting rise
Serving Suggestions
These pillowy-soft rolls are perfect holiday recipes accompaniments. Serve warm in a bread basket lined with a festive napkin. Provide honey butter, regular butter, or flavored compound butters on the side. They’re ideal for soaking up gravy and complementing savory main dishes.
Common Mistakes to Avoid
- Too-hot liquid: Temperatures above 120°F kill yeast. Use a thermometer
- Not kneading enough: Proper kneading develops gluten for soft, fluffy rolls
- Rushing the rise: Patience creates better texture and flavor
Storing Tips for the Recipe
- Room temperature: Store in airtight container for 2-3 days
- Freeze: Wrap individually and freeze for up to 3 months. Thaw and warm before serving
- Make-ahead: Prepare through shaping, refrigerate overnight. Let come to room temperature, then rise and bake
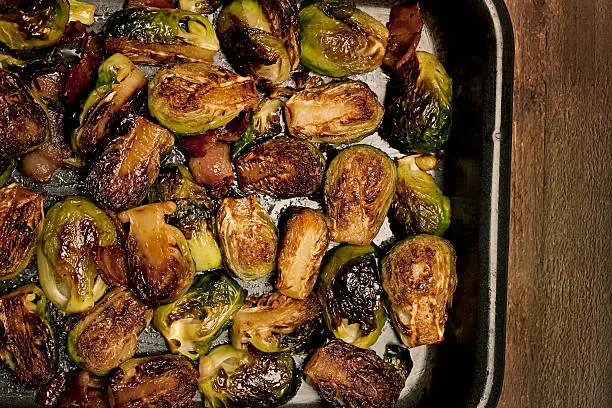
Recipe 7: Roasted Brussels Sprouts with Bacon and Balsamic Glaze
Ingredients List
- 2 pounds Brussels sprouts (trimmed and halved)
- 6 slices thick-cut bacon (chopped). Substitution: Turkey bacon or pancetta.
- 3 tablespoons olive oil
- 1 teaspoon sea salt
- ½ teaspoon black pepper
- ¼ cup balsamic vinegar
- 2 tablespoons honey or maple syrup
- ¼ cup dried cranberries (optional)
- ¼ cup toasted pecans (optional)
Timing
- Prep Time: 15 minutes
- Cook Time: 30 minutes
- Total Time: 45 minutes
Step-by-Step Instructions
Step 1: Prep and Preheat
Preheat oven to 400°F (200°C). Line a large baking sheet with parchment paper. In a large bowl, toss halved Brussels sprouts with olive oil, salt, and pepper until evenly coated.
Step 2: Roast Brussels Sprouts
Spread Brussels sprouts cut-side down in a single layer on the prepared baking sheet. Scatter chopped bacon over and around the sprouts. Roast for 25-30 minutes, stirring halfway through, until Brussels sprouts are caramelized and crispy at the edges.
Step 3: Make Balsamic Glaze
While vegetables roast, combine balsamic vinegar and honey in a small saucepan over medium heat. Simmer for 8-10 minutes until reduced by half and syrupy. The glaze should coat the back of a spoon.
Step 4: Combine and Serve
Transfer roasted Brussels sprouts and bacon to a serving dish. Drizzle with balsamic glaze and toss to coat. If using, sprinkle with dried cranberries and toasted pecans for added texture and holiday flair.
Nutritional Information (Per serving, serves 8)
- Calories: 155
- Total Fat: 10g (13% DV)
- Carbohydrates: 14g (5% DV)
- Fiber: 4g (14% DV)
- Protein: 6g
- Vitamin C: 120% DV
- Vitamin K: 195% DV
Healthier Alternatives for the Recipe
- Omit bacon and add smoked paprika for smoky flavor without added fat
- Use turkey bacon to reduce calories and saturated fat by 40%
- Skip the glaze for a simpler, lower-sugar preparation
Serving Suggestions
These caramelized Brussels sprouts are show-stopping holiday recipes side dishes. Serve on a rustic wooden platter for beautiful presentation. They complement roasted meats, poultry, and vegetarian main courses equally well. The combination of sweet, savory, and tangy flavors appeals to even Brussels sprout skeptics.
Common Mistakes to Avoid
- Not drying Brussels sprouts: Moisture prevents caramelization. Pat dry after washing
- Overcrowding the pan: Use two pans if necessary for proper roasting
- Undercooking: Brussels sprouts need high heat and time to develop sweet, nutty flavor
Storing Tips for the Recipe
- Refrigerate: Store in airtight container for up to 3 days
- Reheat: Warm in 375°F oven for 8-10 minutes to restore crispness
- Make-ahead tip: Trim and halve Brussels sprouts 1 day ahead. Store in refrigerator. Roast just before serving
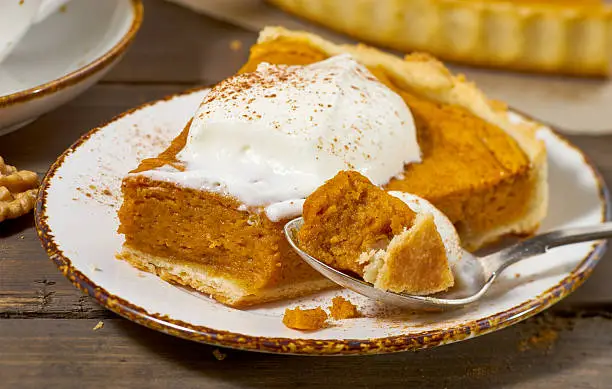
Recipe 8: Classic Pumpkin Pie with Whipped Cream
Ingredients List
For the Crust:
- 1¼ cups all-purpose flour. Substitution: Gluten-free flour blend.
- ½ teaspoon salt
- 1 tablespoon sugar
- ½ cup cold unsalted butter (cubed)
- 3-4 tablespoons ice water
For the Filling:
- 1 can (15 oz) pure pumpkin puree (not pumpkin pie filling)
- ¾ cup packed brown sugar
- 2 large eggs (plus 1 egg yolk)
- 1 can (12 oz) evaporated milk
- 2 teaspoons pumpkin pie spice
- ½ teaspoon salt
- 1 teaspoon vanilla extract
Timing
- Prep Time: 30 minutes
- Chill Time: 1 hour
- Cook Time: 55 minutes
- Total Time: 2 hours 25 minutes
Step-by-Step Instructions
Step 1: Make the Pie Crust
In a food processor, pulse flour, salt, and sugar. Add cold butter cubes and pulse until mixture resembles coarse crumbs. Add ice water 1 tablespoon at a time, pulsing until dough just comes together. Form into a disk, wrap in plastic, and refrigerate for 1 hour.
Step 2: Roll and Blind Bake
Roll chilled dough on a floured surface to 12-inch circle. Transfer to 9-inch pie pan, trim edges, and crimp. Prick bottom with fork. Freeze for 15 minutes. Preheat oven to 375°F (190°C). Line crust with parchment and pie weights. Bake for 15 minutes, remove weights, and bake 5 more minutes until lightly golden.
Step 3: Prepare Pumpkin Filling
In a large bowl, whisk pumpkin puree, brown sugar, eggs, egg yolk, evaporated milk, pumpkin pie spice, salt, and vanilla until completely smooth. The mixture should be silky and free of lumps.
Step 4: Bake the Pie
Pour filling into partially baked crust. Bake at 375°F for 50-55 minutes until edges are set but center still jiggles slightly when gently shaken. The filling will continue setting as it cools.
Step 5: Cool and Serve
Cool completely on a wire rack (at least 4 hours or overnight in refrigerator). Serve chilled or at room temperature topped with fresh whipped cream and a sprinkle of cinnamon.
Nutritional Information (Per slice, serves 8)
- Calories: 340
- Total Fat: 16g (21% DV)
- Saturated Fat: 10g
- Carbohydrates: 44g (16% DV)
- Protein: 7g
- Vitamin A: 210% DV
Healthier Alternatives for the Recipe
- Use coconut milk instead of evaporated milk for dairy-free option
- Replace half the sugar with maple syrup for less refined sweetener
- Make a gingersnap crust for added flavor and easier preparation
Serving Suggestions
This iconic dessert anchors holiday recipes collections nationwide. Serve with freshly whipped cream, vanilla ice cream, or caramel sauce. For presentation, dust with cinnamon or add a cinnamon stick garnish. Pair with hot coffee, spiced chai, or dessert wine for an elegant finish to your feast.
Common Mistakes to Avoid
- Overbaking: Pie is done when edges are set but center wobbles. It firms up during cooling
- Using pumpkin pie filling: Always use pure pumpkin puree for best flavor control
- Skipping blind baking: This prevents a soggy bottom crust
Storing Tips for the Recipe
- Refrigerate: Cover and store for up to 4 days
- Freeze: Wrap tightly and freeze for up to 2 months. Thaw in refrigerator overnight
- Make-ahead: Bake 1-2 days before serving. Flavor actually improves as it sits
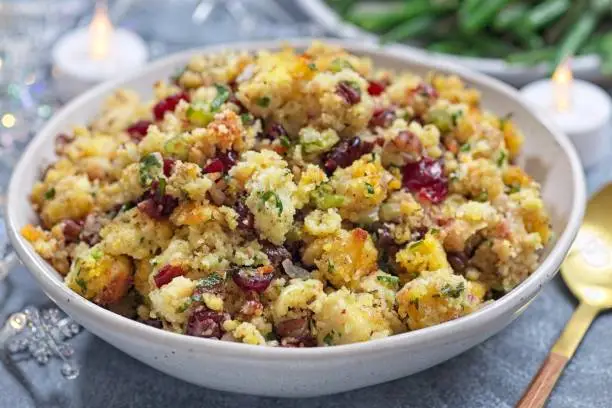
Recipe 9: Sausage and Herb Stuffing
Ingredients List
- 1 pound crusty bread (cut into 1-inch cubes, about 12 cups). Substitution: Cornbread for Southern style.
- 1 pound Italian sausage (casings removed). Substitution: Turkey sausage or plant-based sausage.
- ½ cup unsalted butter
- 2 cups diced yellow onion (about 1 large onion)
- 1½ cups diced celery (about 4 stalks)
- 4 cloves garlic (minced)
- 2 tablespoons fresh sage (chopped)
- 2 tablespoons fresh thyme (leaves stripped)
- 1 tablespoon fresh rosemary (chopped)
- 3 cups chicken or vegetable broth (warmed)
- 2 large eggs (beaten)
- 1 teaspoon sea salt
- ½ teaspoon black pepper
Timing
- Prep Time: 25 minutes
- Drying Time: Overnight (optional but recommended)
- Cook Time: 50 minutes
- Total Time: 1 hour 15 minutes
Step-by-Step Instructions
Step 1: Dry the Bread
Spread bread cubes on baking sheets and let sit overnight uncovered, or bake at 250°F (120°C) for 45 minutes until dried but not toasted. This prevents soggy stuffing.
Step 2: Cook the Sausage
In a large skillet over medium-high heat, cook crumbled sausage for 8-10 minutes until browned and cooked through. Transfer to a plate with a slotted spoon, leaving fat in the pan.
Step 3: Sauté Vegetables
In the same skillet, melt butter. Add onion and celery, cooking for 8 minutes until softened. Add garlic and herbs, cooking 2 more minutes until fragrant.
Step 4: Combine All Ingredients
In a very large bowl, combine dried bread cubes, cooked sausage, and vegetable mixture. Pour warm broth over everything and toss gently. Add beaten eggs, salt, and pepper, mixing until bread is evenly moistened but not mushy.
Step 5: Bake to Perfection
Transfer to a buttered 9×13-inch baking dish. Cover with foil and bake at 350°F (175°C) for 30 minutes. Remove foil and bake another 20 minutes until top is golden and crispy.
Nutritional Information (Per serving, serves 12)
- Calories: 290
- Total Fat: 15g (19% DV)
- Carbohydrates: 28g (10% DV)
- Protein: 12g
- Fiber: 2g (7% DV)
Healthier Alternatives for the Recipe
- Use whole grain or sourdough bread for added nutrients
- Replace half the butter with olive oil
- Choose turkey or chicken sausage to reduce saturated fat by 50%
- Add diced apples or dried cranberries for sweetness without refined sugar
Serving Suggestions
Stuffing is a cornerstone of holiday recipes traditions. Serve directly from the baking dish or transfer to a festive serving bowl. It pairs perfectly with turkey, gravy, cranberry sauce, and all traditional sides. Leftovers make exceptional turkey sandwiches or can be formed into patties and pan-fried for breakfast.
Common Mistakes to Avoid
- Using fresh bread: Fresh bread creates gummy texture. Always dry bread first
- Too much liquid: Stuffing should be moist but not soggy. Add broth gradually
- Not pre-cooking sausage: Raw sausage releases excess fat during baking
Storing Tips for the Recipe
- Refrigerate: Store covered for up to 4 days
- Reheat: Cover with foil and warm at 350°F for 20-25 minutes
- Make-ahead: Assemble completely, cover, and refrigerate up to 1 day ahead. Bake when ready
- Freeze: Freezes well for up to 3 months. Thaw overnight before reheating
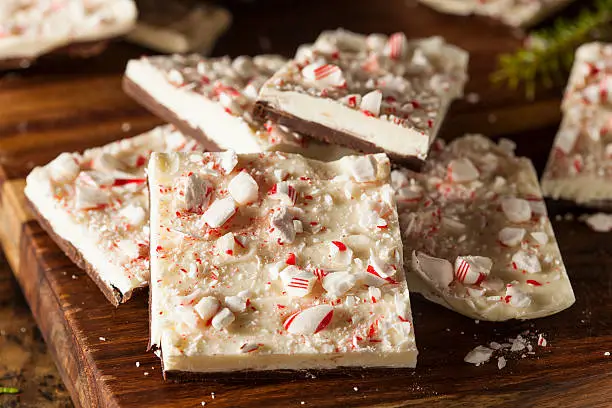
Recipe 10: Chocolate Peppermint Bark
Ingredients List
- 12 oz dark chocolate (60-70% cacao, chopped). Substitution: Semi-sweet chocolate chips.
- 12 oz white chocolate (chopped). Substitution: White chocolate chips.
- ¾ teaspoon peppermint extract (divided)
- ½ cup crushed candy canes or peppermint candies
- Pinch of sea salt (optional, for topping)
Timing
- Prep Time: 15 minutes
- Chill Time: 1 hour
- Total Time: 1 hour 15 minutes
Step-by-Step Instructions
Step 1: Prepare the Pan
Line a 9×13-inch baking pan with parchment paper, leaving overhang on the sides for easy removal. This prevents sticking and ensures clean edges.
Step 2: Melt Dark Chocolate Layer
Melt dark chocolate in a double boiler or microwave in 30-second intervals, stirring between each, until smooth. Stir in ¼ teaspoon peppermint extract. Pour into prepared pan and spread evenly with an offset spatula. Refrigerate for 30 minutes until firm.
Step 3: Add White Chocolate Layer
Melt white chocolate using the same method. Stir in remaining ½ teaspoon peppermint extract. Pour over the chilled dark chocolate layer and spread evenly.
Step 4: Add Toppings
Immediately sprinkle crushed candy canes over the white chocolate layer while still wet, pressing gently to adhere. Add a light sprinkle of sea salt if desired for sophisticated flavor contrast.
Step 5: Chill and Break into Pieces
Refrigerate for at least 30 minutes until completely set. Lift bark from pan using parchment overhang. Break into irregular pieces for rustic presentation or cut into neat squares.
Nutritional Information (Per 1 oz piece)
- Calories: 145
- Total Fat: 9g (12% DV)
- Saturated Fat: 5g
- Carbohydrates: 16g (6% DV)
- Sugar: 14g
- Protein: 2g
Healthier Alternatives for the Recipe
- Use sugar-free chocolate to reduce sugar by 70%
- Choose dark chocolate with 85% cacao for increased antioxidants
- Add chopped nuts for protein and healthy fats
- Use natural peppermint oil (food-grade) instead of extract for pure flavor
Serving Suggestions
This festive treat is perfect for holiday recipes gift-giving. Package pieces in clear cellophane bags tied with red ribbon. Arrange on dessert platters alongside cookies, fudge, and other sweets. Serve with coffee, hot chocolate, or peppermint tea. It’s also delightful crumbled over ice cream or incorporated into holiday desserts.
Common Mistakes to Avoid
- Overheating chocolate: This causes it to seize and become grainy. Melt gently
- Not letting first layer set: Layers will mix together if dark chocolate isn’t firm
- Using imitation vanilla: Real peppermint extract provides authentic, strong flavor
- Adding toppings too late: Candy must be pressed into wet chocolate to stick
Storing Tips for the Recipe
- Room temperature: Store in airtight container in cool, dry place for up to 2 weeks
- Refrigerate: For longer storage (up to 1 month), layer between parchment in airtight container
- Avoid freezing: Chocolate can develop condensation and white bloom when thawed
- Gift-giving: Package 2-3 days before gifting for optimal freshness
Conclusion
These 10 magnificent holiday recipes provide everything you need for an unforgettable celebration. From the elegant Cranberry Brie Bites that welcome guests to the indulgent Chocolate Peppermint Bark that ends the meal on a sweet note, each recipe has been carefully selected to balance impressive presentation with achievable execution. Whether you’re preparing a complete feast or contributing dishes to a potluck, these versatile recipes adapt to your needs while maintaining exceptional flavor and quality that will have everyone asking for your secrets.
Ready to become the holiday host everyone remembers? Choose your favorites from these holiday recipes and start planning your menu today. We’d love to see your creations and hear about your cooking experience! Please share your photos, leave a review, and tell us which recipe became your new tradition in the comments section below. Don’t forget to subscribe to our blog for weekly recipe inspiration, cooking tips, seasonal menu planning guides, and exclusive content delivered straight to your inbox. Your feedback helps us create better content for our entire community. Happy cooking, and may your holidays be filled with delicious memories!
FAQs
Q1: Can I prepare these holiday recipes ahead of time?
A: Absolutely! Most of these holiday recipes have excellent make-ahead components. The Cranberry Brie Bites can be assembled 24 hours ahead and baked fresh. Turkey can be brined days in advance. Mashed potatoes stay warm in a slow cooker for hours. Green Bean Casserole and stuffing can be fully assembled a day ahead. Dinner rolls freeze beautifully for up to 3 months. Pumpkin pie and peppermint bark actually taste better after sitting. Plan your timeline to maximize efficiency and minimize stress on the day of your event.
Q2: How do I scale these recipes for larger or smaller gatherings?
A: All these holiday recipes scale beautifully! For appetizers like Cranberry Brie Bites, simply multiply or divide ingredients proportionally. Main courses like turkey should be calculated at ¾ to 1 pound per person (bone-in weight). Side dishes typically serve 8-12, so double recipes for crowds over 16 people. For smaller gatherings under 6 people, consider making just 4-5 recipes instead of all 10, or halve the recipes. Most dishes store well, so don’t be afraid of having leftovers for delicious post-holiday meals.
Q3: What dietary restrictions can these recipes accommodate?
A: These holiday recipes offer flexibility for various dietary needs. For gluten-free guests, use certified gluten-free bread for stuffing and gluten-free flour blends for pie crust and dinner rolls. Dairy-free options include using plant-based butter, coconut milk, and dairy-free chocolate. Vegetarians can omit sausage from stuffing and bacon from Brussels sprouts while adding mushrooms for umami. Several recipes are naturally vegetarian like the maple carrots, mashed potatoes (when made with plant milk), and peppermint bark. Always communicate with guests about ingredients and cross-contamination concerns.
Q4: What’s the best order to cook everything for a holiday dinner?
A: Strategic timing ensures everything finishes together. Start with the turkey since it takes longest (4+ hours including rest time). While turkey roasts, prepare make-ahead items like pie, stuffing assembly, and chopped vegetables. Two hours before serving, start mashed potatoes. One hour before, begin roasting Brussels sprouts and carrots. Thirty minutes before, bake the green bean casserole and warm dinner rolls. Make appetizers fresh when guests arrive. This timeline can shift based on your oven capacity, so plan accordingly and use warming drawers or slow cookers for finished dishes.
Q5: How can I make these recipes more budget-friendly?
A: Several strategies make these holiday recipes more affordable without sacrificing quality. Buy a smaller turkey (10-12 pounds serves 8-10 people adequately). Purchase ingredients on sale weeks ahead and freeze what you can. Use frozen vegetables like green beans instead of fresh. Make your own broth from vegetable scraps. Skip expensive garnishes and focus on taste. Choose store-brand ingredients for pantry staples. Assign dishes to guests as a potluck-style celebration. Shopping at discount grocers and using coupons can reduce your total meal cost by 30-40% while maintaining delicious results.
Q6: What equipment do I need to make all these recipes?
A: Essential equipment includes: large roasting pan with rack (for turkey), 9×13-inch baking dishes (at least 2), several baking sheets, large pot for boiling, stand or hand mixer, meat thermometer (critical for turkey and ham), sharp knives, and basic mixing bowls. Nice-to-have items include a food processor for pie crust and stuffing prep, slow cooker for keeping dishes warm, and a kitchen scale for precise measurements. Most home kitchens already have these basics. If you’re missing equipment, borrow from friends or family or consider disposable aluminum pans for casseroles.
Q7: How do I keep food warm if my oven is full?
A: Excellent question for holiday recipes coordination! Use slow cookers on the warm setting for mashed potatoes, gravy, and sides. Wrap finished dishes tightly in foil and towels to insulate them (they’ll stay warm for 30-45 minutes). A cooler (yes, really!) lined with towels works similarly. Utilize warming drawers if you have them. Reheat dishes briefly in the microwave just before serving. Plan your oven schedule strategically so the turkey rests while sides bake. Consider borrowing a neighbor’s oven for overflow or using outdoor grills for keeping dishes warm.
Q8: What are the best wine pairings for these holiday recipes?
A: Wine pairings elevate your holiday recipes experience. For turkey and lighter dishes, choose Pinot Noir, Chardonnay, or Beaujolais. Rich sides like mashed potatoes and stuffing pair well with Sauvignon Blanc or Riesling. Brussels sprouts and vegetables work with crisp white wines or light reds. Desserts like pumpkin pie are divine with late-harvest Riesling, Port, or sparkling Prosecco. For non-alcoholic options, serve sparkling apple cider, cranberry spritzers, or ginger-infused mocktails. Offer at least one red, one white, and one non-alcoholic option to accommodate all preferences. Most importantly, serve wines you enjoy!